Friday, July 25, 2008

How to upload fotos from picasa to gmail directly

Follow the following steps to upload fotos from picasa to gmail directly,

Step1:
Open picasa, It will automatically search for the images and folder containing images in your local system, and place them at left side panel.Default select folder images will be displayed on right side panel. Now select the folder to upload into gmail

Step2:
Select Web album button It will open a popup window
Step3:
If you have already gmail account select Existing User? Sign in Option, Otherwise go for New User? Sign up

Step4:
If you selected Existing User? Sign in It will open a new window to access gmail account. Enter username and password of gmail account, and Sign in.

Step5:
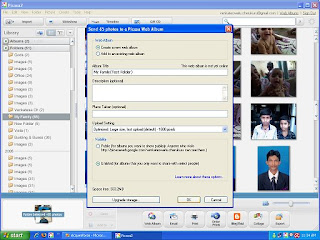
In this step you have to select the web album(select Create a new web album). Enter Album title and description. For giving access permissions to Album go for validity section. Select Unlister option to restrict for other user. (You only v=can view this album). And finally select OK.

Step6:
Now the uploading process of complete selected folder will start.


Step7:
Login to your gmail account and slecet Photos otion from top menu. Here you can find the Album

Tuesday, July 15, 2008

డాట్ నెట్ నుండి మెయిల్ ఎలా సెంద్ చెయ్యాలి ?

హాయ్,
డాట్ నెట్ ఉపయోగించి మెయిల్ పంపించాలంటే మీరు చేయాల్సింది .
1.Add the following code to web.config file

<appSettings>

<add key="SMTPServer" value="mail.mailserver.com"/>

<add key="SMTPServerUID" value="test@mailserver.com"/>

<add key="SMTPServerPWD" value="passwordtest"/>

<add key="SMTPServerPORT" value="25"/>

</appSettings>

<system.net>

<mailSettings>

<smtp from="test@mailserver.com">

<network host="mail.mailserver.com" password="passwordtest" userName="test@mailserver.com"/>

</smtp>

</mailSettings>

</system.net>

2.Add the following method to where you required in .cs పేజి
public void SendMail()
{
MailMessage objMail = new MailMessage();
objMail.From = new MailAddress("v_cherukuri@redsalsa.com", "Cherukuri Articles");
if (txtRecipient.Text.Trim() != "")
objMail.To.Add("cherukuri@venkateswarlu.co.in");
objMail.CC.Add("cherukuri@venkateswarlu.co.in");
objMail.Subject = "Article :: ";
objMail.Body = "Hi";
Send(objMail);
}

Thursday, July 10, 2008

JavaScript Popup Boxes

Alert Box
An alert box is often used if you want to make sure information comes through to the user.
When an alert box pops up, the user will have to click "OK" to proceed.
Syntax:
alert("sometext");

Creating a New Integration Services Project

Creating a New Integration Services Project
The first step in creating a package in Microsoft SQL Server 2005 Integration Services (SSIS) is to create an Integration Services project. This project includes the templates for the objects — data sources, data source views, and packages — that you use in a data transformation solution.
The packages that you will create in this Integration Services tutorial interpret the values of locale-sensitive data. If your computer is not configured to use the regional option English (United States), you need to set additional properties in the package. The packages that you use in lessons 2 through 5 are copied from the package created in lesson 1, and you need not update locale-sensitive properties in the copied packages.
To create a new Integration Services project

On the Start menu, point to All Programs, point to Microsoft SQL Server 2005, and click SQL ServerBusiness Intelligence Development Studio.
On the File menu, point to New, and click Project to create a new Integration Services project.
In the New Project dialog box, select Integration Services Project in the Templates pane.
In the Name box, change the default name to SSIS Tutorial. Optionally, clear the Create directory for solution check box.
Accept the default location, or click Browse to browse to locate the folder you want to use.
In the Project Location dialog box, click the folder and click Open.
Click OK.
By default, an empty package, titled Package.dtsx, will be created and added to your project.
In the Solution Explorer toolbar, right-click Package.dtsx, click Rename, and rename the default package to Lesson 1.dtsx.
When prompted to rename the package object, click Yes.
To set locale sensitive properties

On the View menu, click Properties Window.
In the Properties window, set the LocaleID property to English (United States).
For more details http://technet.microsoft.com/en-us/library/ms170057.aspx